
Navigate the 3D Sama platform
Updated at July 17th, 2026
This section provides an overview of the tools available within the 3D workspace, designed to help you efficiently interact with and navigate through your 3D environment.
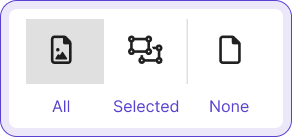
Display Shapes
This section of the menu contains helpful tools for adjusting how the image and shapes are displayed
 |
|
| If your workspace has many shapes on it, these three options can be extremely helpful for removing visual clutter while you work. |
View Settings
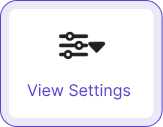 |
| View settings allow you to personalize how shapes are displayed in the workspace. These settings are just for the workspace and aren't saved with the task when submitted. |
Opacity
Increases or decreases the opacity of shapes so that you can see less or more of the image behind.

Use case
- Reduce the opacity to check any missing point
- Check the points behind the cuboid
Point Size
With this tool, you can easily select a pixel size from 1px to 5px.

Use case
- Depending on the object you are annotating, it can be helpful to change the point size of the point cloud.
📘 Note
Return to the default points size by clicking the undo button next to the slider.
Intensity
Intensity allows you to target your intensity color pallets, making it possible to enhance the color pallet for ground reflective objects.
Intensity values represent how “reflective” the surface of an object is. When it is reflective, like a traffic sign, the values will be on the “High spectrum”. When they have low reflectivity, the values will be on the “Low spectrum”.

Click on the view settings menu. You can define the minimum and maximum intensity values you would like your intensity pallet to be applied. You can play with ranges to find the object you are looking for!
Use case
- This is a relevant feature when you are doing lane marking annotation.
- If you want to only focus on the higher-intensity values.
- If you want to target a specific area of intensity.

📘 Note
Return to the default intensity by clicking the undo button next to the slider.
Here is an overview of the diferent intensities:
Inside Focus Cuboid
Highlight the colors inside an annotation

Use case
- Easily detect quality issues
 |
 |
Max intensity

Mixed intensity

Cameras and Ground View
| This menu section allows you to adjust the camera's view, as well as the ground and route for each annotation. It's your playground for changing how you see things. |
Toggle Route
Routes allow you to select objects and visualize their keypoint positions over time, enabling a quick review of object paths and easy detection of any significant deviations. This feature is enabled by default when loading a task but only activates upon object selection.
Use case
- Future Frame Preview: Routes help you visualize how future frames will look, allowing you to check the alignment of keyframes and ensure consistency in object positioning.
- Multi-Object Comparison: When selecting multiple shapes, routes display each object's path, making it easier to compare routes and detect any misalignment or deviations.

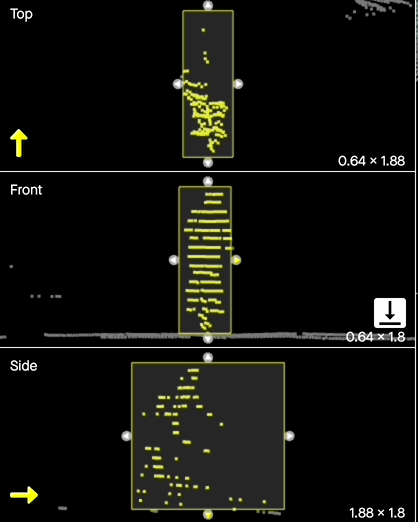
Toggle Orthographic Camera
The Toggle Orthographic Camera tool lets you change the camera perspective to view the scene from above, providing a clear, undistorted top-down view. This orthographic view allows you to see the scene as a flat projection.
Use Case
Use the Toggle Orthographic Camera to adjust the point cloud view, enabling a comprehensive, overhead perspective of the entire scene. This top-down view is especially useful for analyzing spatial relationships and ensuring accurate positioning within the workspace.

Toggle Ground
The Toggle Ground tool allows you to remove or hide the ground plane within the 3D workspace.

Use case
- Use the Toggle Ground tool to remove the ground plane, isolating objects within the scene
Reset Camera
The “reset camera” tool provides the initial perspective of the point cloud when it was first loaded, based on the sensor location information provided.

Use case
- This view is situated behind the sensor and offers the same perspective as the 2D front camera view. In most cases, the first view aligns with the direction of the 2D camera, allowing for easy comparison between the two views.
Toggle Inspect Mode
The Toggle Inspect Mode tool enables you to zoom in and focus on a specific annotation within the 3D workspace. By selecting an annotation and activating Inspect Mode, you can isolate and closely examine it without surrounding distractions. This tool is ideal for detailed review and precision adjustments of individual annotations.

Use case
- Zoom in on a specific annotation by selecting the annotation and then clicking on the toggle inspect mode.
- Use this tool when you just want to focus on a single annotation.
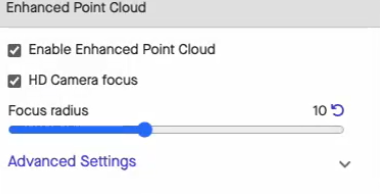
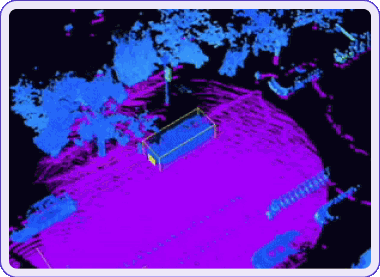
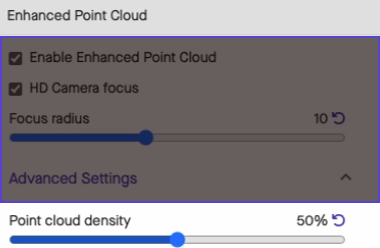
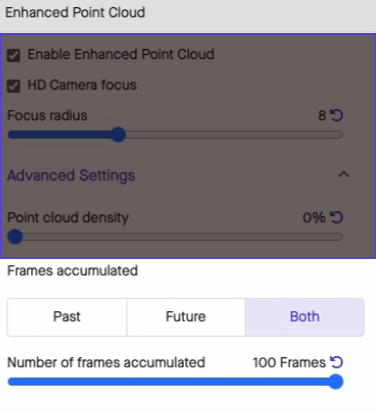
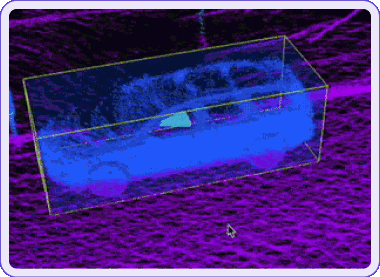
Enhanced Point Cloud
|
The enhanced point cloud feature allows you to view every single frame on a task. Use this tool to better assess or estimate the true size of the object. 📘 Note Enhanced point cloud can be used with dynamic and static objects Focus radius
Point cloud density
Number of frames accumulated
Point cloud color selection
|


Other Tools
Keyboard Shortcuts
|
This button displays a pop-up cheat sheet of all the available keyboard shortcuts for easy reference. 👍 Tip Use keyboard shortcuts whenever possible to save time when annotating. Annotators who use keyboard shortcuts for all their repetitive tasks are substantially more efficient than annotators who rely on a mouse.  |
Mouse Coordinates
In the bottom right of the workspace, you can see the X and Y coordinates of your mouse on the image.

Shape Panel
The Shape Panel provides an organized view of all shapes, making it easy to manage and review each one in detail.
- Shapes are collapsed by default and expand when selected, keeping the panel streamlined.
-
Each shape item includes:
- A header with the main label and shape number.
- An expandable section displaying each attribute with its respective label.
- Groups of shapes are color-coded, allowing multiple shapes to be combined visually for easy differentiation.
How to Use the Shape Panel:
- Click on a shape to select it.
- Click on the arrow to expand attributes for a single shape.
- Click on the double arrow to expand all attributes for every shape.

Thumbnail
Use the thumbnail to navigate the 3D scene, change outputs, inspect a shape, and see the navigation updating in 2D and 3D

Focus Timeline
The focus timeline is a horizontal slider control allowing users to move between frames/images within a video.
Important Frames
The Previous Important Frame and Next Important Frame buttons allow you to navigate through the timeline by jumping directly to each keyframe. This feature enables you to move exclusively through frames that contain annotations, skipping any frames without them.

Five Frames
These buttons allow you to jump forward or backward in the video sequence, five frames at a time.

One Frame
These buttons allow you to navigate through the timeline one frame at a time.

Focus Area
The focus area shows witch tha starting frame and the ending frame. You an get this information from the frame number and also from the timeline. This tool is useful to see all the annotation details between frames.

Frame Count
Frame count has two functionalities, it shows the current frame where you are, but it is also editable. This means that you can change the frame number and the workspace will show that specific frame.

Frame Timeline
The frame timeline is a horizontal slider control that tells the user all the important details about an annotation in a specific frame.
Frames Timeline
The frame timeline is a horizontal slider control that tells the user all the important details about an annotation in a specific frame.

Simbology
| A keyframe is represented by a circle. When you add or update an annotation, this symbol will appear in the frame timeline to indicate the change. | When an annotation has a dynamic label, the frame will display a diamond symbol. | In some cases, a frame can be both a keyframe and have a dynamic label. In this case, the frame in the timeline will display both a circle and a diamond. |
Visibility
 |
 |
 |
| Visible frames are represented by purple rectangles | Disable frames are represented by purple stripes | Not visible frames are represented with gray rectangles |